_1.jpeg)
Seven Bass Design offers a wide range of float tubes for the pursuit of predator fish, from trout and pike to larger species such as catfish. To help you get the most out of your float tube, we're going to give you a few tips on how to set up your boat.
First, we'll look at the concept of transporting a Seven bass float tube. Depending on the model you own and its dimensions, you'll need more or less space to organise it, which can sometimes be essential to the quality of your outing. Next, we'll look at one of the most important concepts: inflation. From advice on pumps to inflation pressure, we'll try to give you the keys to a successful fishing trip.
We'll then look at the installation of accessories on a Seven bass float tube, such as a motor support. These are often numerous and require careful positioning to ensure they don't take up too much space once you're on the water. It's often the details that make the difference. Finally, we'll look at how dismantling your float tube can make your next session easier.
Transport
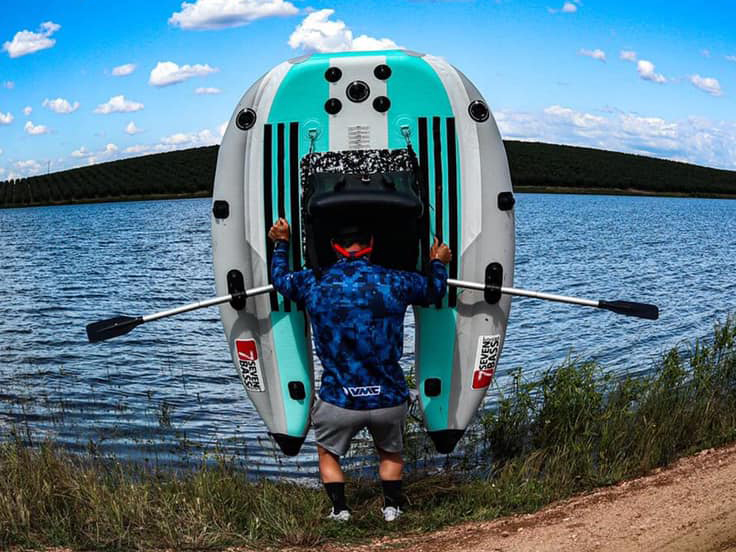
You are a lucky few who can transport this type of equipment, with its large dimensions, directly inflated in your car. But for most of you, these boats are folded up, often in a bag.
Transporting a float tube can be more or less complicated if you don't organise the operation. We therefore advise you to use a bag to protect the canvas from any objects that might fall into your vehicle. We also advise you to opt for models with padded shoulder straps. It's easy to get into the water from a considerable distance, which can mean a long and not always very comfortable walk. Add to that accessories like flippers, oars, a motor or even a rod holder, and you'll see that having your hands free is an essential.
Imagine carrying your float tube on your back and the rest of your accessories in your hands.... A real expedition. It's not the most comfortable, but it will undoubtedly allow you to arrive with more energy for your fishing. Don't forget to take your repair kit with you, as it's included in the entire Seven Bass Design range(you'll also find them with competitors such as the jmc commando)
Inflating: a key operation
.jpeg)
This is the moment of greatest importance for your entire Seven bass float tube expedition. To make this operation easier, it's best to lay your float tube flat. This way there will be fewer creases on the product and the air will enter more easily. You will then have to repeat the movements required to activate the pump if it is manual.
You can opt for a single-action pump, a double-action pump or a very high-pressure pump with a pressure gauge. A Seven bass design like the flatform junior or the Jungle operator will require you to use the latter model to ensure you always have the right pressure and inflate their large dimensions more quickly. You'll find the same concept on a paddle.
There are a few things you need to do to get the most out of your Seven Bass float tube. For chamber models, you'll need to pay close attention to the temperature. The volume of air will not be the same depending on the time of day. In full sun on thewater, the pressure will tend to rise in the tubes, eventually reaching the chamber's resistance limit. Remember not to inflate too much if you put the boat in thewater when it's cool.
You'll notice the same problem with pvc models such as Seven Bass Cobra or Brigad. However, as this product is more solid with a thicker fabric, the risk of a hole forming is highly unlikely. In this case, simply inflate to ensure that you are in a comfortable position relative to the surface of thewater.
For the more upmarket models with pressure requirements, simply follow the needle on your pressure gauge. We advise you to be very careful when using an electric pump, which should always be supervised.
Installing accessories
This is the part that will require the most attention before you start fishing. You'll need to position everything you need so that you still have enough room to fish properly.
You'll need to position your rod holders as well as possible. They can be fitted to the right or left of any of the brand's products, thanks to specific systems designed to accommodate them.
Using a patch, you can install your fish finder and its transducer, as well as other less essential accessories such as a camera or phone holder.
The most difficult part will be installing the motor if you have chosen this option. You need to position the unit in thewater to make it easier to move around once it's fully equipped, and to deal with problems of depth.
After a few years, or a few outings for the more resourceful, your habits will have got the better of your hesitations, allowing you to quickly install each accessory, each support and even the motor, having already provided a place for everything you bring along for your fishing session.
Dismantling
This is the last part of your day of predator fishing. Everything has to be packed away, and in the rush you may forget a few essential rules.
Whether you're fly fishing or lure fishing for predators, all the equipment you've brought with you will need to be in its rightful place before you set off again. This is an opportunity to protect everything well and not forget anything on the edges: rod holders, fins, pumps, etc
You may also like :