In the end, a reel is just a set of parts that are designed to work together. The complexity of disassembling a reel may seem daunting at first, but it can turn out to be quite easy if you use a bit of method, photos and a very good screwdriver of the right size.
At daiwa, the first thing to accept is that some modern models cannot be dismantled. Certain bearings and technologies requiremaintenance on a particular range to be carried out directly in the brand's workshops, which are the only ones capable of carrying out these operations.
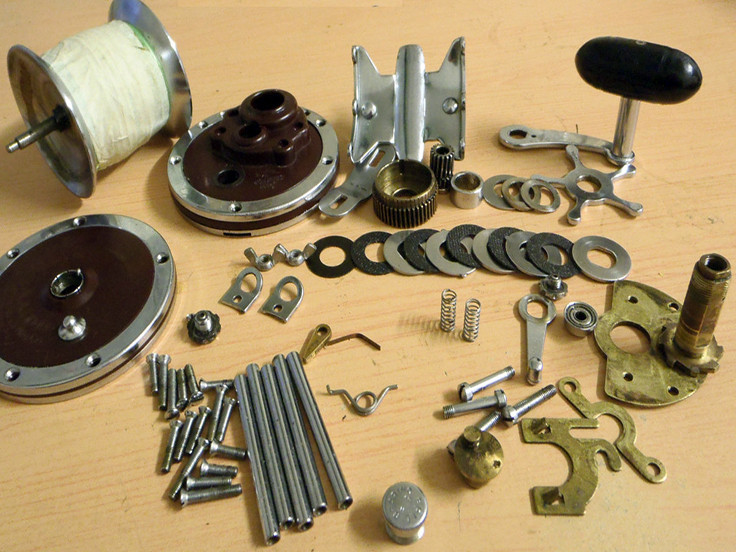
You'll need to understand the purpose of the various components you come across. You already know where the crank and brake knob are, but you'll also need to familiarise yourself with some new words. You'll need to locate theaxle, the control wheel, the roller and the rotor.
You need to be organised and work in stages. Theorder in which the various components are removed should be noted so that you can proceed with reassembly in a methodical manner, without the risk of finding yourself with a part such as washers in your hands once everything has been reassembled.
These operations will make it easier to clean off the salt that can sometimes seep in deeply, but they will also make the machine run more smoothly, especially by making it easier to retrieve the wire. All that's left for you to do is go fishing and enjoy your work as a passionate and patient goldsmith.
Daiwa reels that cannot be disassembled
We start with this, because it's important to be warned. First of all, a reel that is still under warranty must not be dismantled. Any intervention on your part could invalidate the brand's liability. You will end up with a recent model and the obligation to finance its repair.
Recent models, particularly those with magsealed technology, require dismantling to be carried out by a professional. Otherwise there is a clear risk that you will no longer be able to use your product under normal conditions. You need very specific skills and equipment.
In the case of magsealed bearings, you can move and replace them without risk. They have magnetised oil, but they can be moved from the axles on which they are installed. So you can't work on the inside, but you can work on everything around it.
Among the big names in models that can't be dismantled areExist, Certate, Airity and Ballistic for freshwater. On the sea side, the Saltist LTD, Saltiga 2020 or Certate SW will need to be serviced directly in the brand's workshop.
How to dismantle your reel
As with all mechanical work, you need to be well equipped with the right tools to work on the various parts. This ensures easy handling and preservation of the materials without scratching or marking the mechanics, which can be very delicate.
So you'll need a fine-tip screwdriver, small pliers, soft cloths, water, a magnifying glass and a kit including oil, grease and specific tools for the reels. Once you've got all that, you can tackle the technical side.
The first components can be removed without tools. The crank, for example, can be unscrewed either directly into the frame or by unscrewing the small knob opposite. Similarly, the spool can be easily removed. Simply unscrew the brake knob on the top as far as it will go to remove the spool from the top. This will give you access to the spindle and protect the wire or braid during handling.
At this stage, you can already turn to the carbon washers, to check their condition and plan to change them quickly if necessary. You can also clean the spool and degrease and re-grease if necessary.
In the next stages, we'll get into the inner workings of your reels. We advise you to take photos between each new part removed. This will make it easier for you to reassemble the assembly step by step, and in the right order.
Start by removing the side plate, which will give you an overall view of the internal parts. This will enable you to easily locate the roller, the drive wheel and understand the mechanism that drives the rotor. Remember to keep the screws in a small box, away from your movements. That way you won't have to look for them on the floor for minutes on end, and sometimes never find them again.
You can then choose whether to take out the various parts in front of you or clean them directly in the frame. This will depend mainly on whether or not you need to change any parts. Don't hesitate to take photos between each of your actions. If you have the exploded view, that will also be a great help.
Now it's time to reassemble
This is often the most technical and difficult part of the process. You have to go through all the steps in reverse, while giving the parts a new lease of life, free of impurities or traces of salt.
You'll need to remember to distinguish between the right-hand and left-hand sides of each component, and to oil and grease them to make them run more smoothly and quietly. Don't forget to put all thewatertight components back in place so as not to ruin the work you've done in just a few hours of fishing.
The screws do not need to be tightened to the maximum, but only the two parts that enclose the mechanism need to be joined together correctly. And don't forget to re-adjust the braking system so that you don't end up with a failed strike when you use it.
With this information in hand, you'll soon be up and running with your entire range, whatever the size.
Other articles on reels Daiwa: